正如官方所说: camel xml dsl 的简单使用
创建表 我们来初始化两张表以便完成后续操作用户表:
1
2
3
4
5
6
7
CREATE TABLE `sys_user` ( `user_id` bigint (20 ) NOT NULL AUTO_INCREMENT COMMENT '主键id自动增加' , `user_name` varchar (255 ) COLLATE utf8mb4_unicode_ci NOT NULL COMMENT '用户名称' , `user_address` varchar (255 ) COLLATE utf8mb4_unicode_ci NOT NULL COMMENT '用户地址' , `is_del` bigint (20 ) NOT NULL COMMENT '1正常' , PRIMARY KEY (`user_id`) ) ENGINE= InnoDB AUTO_INCREMENT= 5 DEFAULT CHARSET= utf8mb4 COLLATE = utf8mb4_unicode_ci COMMENT= '用户表'
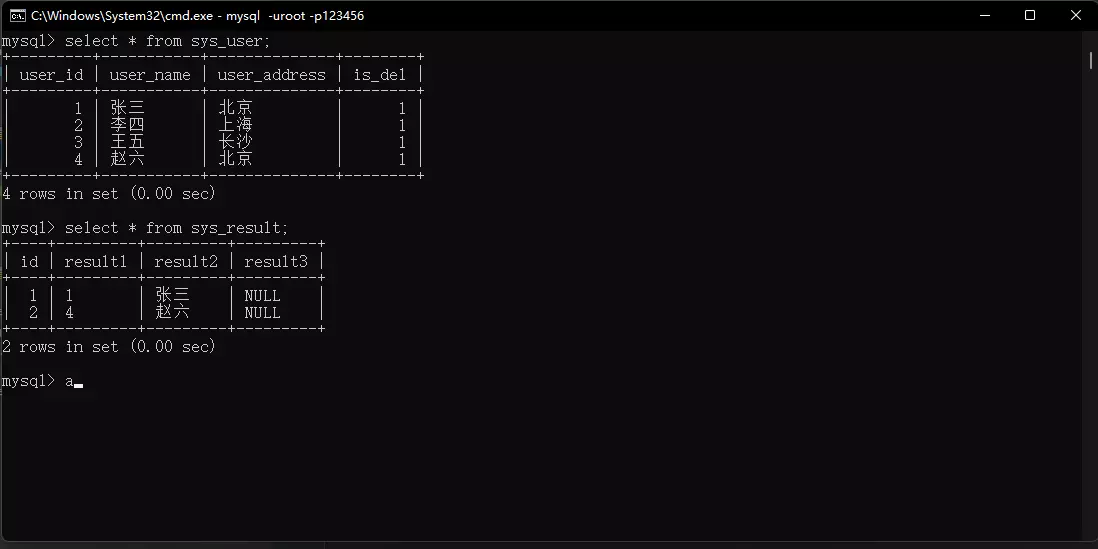
这看起来如下:
user_id
user_name
user_address
is_del
1
张三
北京
1
2
李四
上海
1
3
王五
长沙
1
1
赵六
北京
1
结果表:
1
2
3
4
5
6
7
CREATE TABLE `sys_result` ( `id` bigint (20 ) NOT NULL AUTO_INCREMENT COMMENT '主键id,自动增加' , `result1` varchar (255 ) COLLATE utf8mb4_unicode_ci DEFAULT NULL COMMENT 'result1' , `result2` varchar (255 ) COLLATE utf8mb4_unicode_ci DEFAULT NULL COMMENT 'result2' , `result3` varchar (255 ) COLLATE utf8mb4_unicode_ci DEFAULT NULL COMMENT 'result3' , PRIMARY KEY (`id`) ) ENGINE= InnoDB AUTO_INCREMENT= 3 DEFAULT CHARSET= utf8mb4 COLLATE = utf8mb4_unicode_ci COMMENT= '结果表'
这看起来如下:
id
result1
result2
result3
...
...
...
...
实现数据抽取(Demo01) No.1 查询表中符合规范的数据 No.2 将符合规范的的数据保存到另外一张表 每一个步骤可以看做一个节点 ,如下图:
这里我们将一个节点看作是一个路由
1 2 3 4 5 6 7 8 9 10 11 12 13 14 15 16 17 18 19 20 21 22 23 24 25 <routes xmlns ="http://camel.apache.org/schema/spring" > <route id ="A001" > <from uri ="direct:queryStandardData" /> <to uri ="sql:select t.user_id,t.user_name,t.user_address FROM sys_user t where t.is_del= 1 and t.user_address LIKE CONCAT('%','北','%')" /> <to uri ="direct:saveStandardData" /> </route > <route id ="A002" > <from uri ="direct:saveStandardData" /> <to uri ="log:info" /> <split > <simple > ${body}</simple > <to uri ="sql:insert into sys_result(result1,result2) values (:#user_id,:#user_name)" /> </split > </route > </routes >
启动java程序
1
2
3
4
5
6
7
8
9
10
11
12
13
14
15
16
17
18
19
20
21
22
23
24
25
26
27
28
29
package net.wchar.camel.sample; import org.apache.camel.ExtendedCamelContext; import org.apache.camel.spi.Resource; import org.apache.camel.support.ResourceHelper; import org.junit.jupiter.api.BeforeEach; import org.junit.jupiter.api.Test; import java.nio.file.Files; import java.nio.file.Paths; public class Demo01Test extends CamelSampleApplicationTests { @BeforeEach public void init() throws Exception { byte[] bytes = Files.readAllBytes(Paths.get(this.getClass().getResource("/demo01.xml").toURI())); ExtendedCamelContext ecc = camelContext.adapt(ExtendedCamelContext.class); Resource resource = ResourceHelper.fromBytes("resource.xml", bytes); ecc.getRoutesLoader().loadRoutes(resource); } @Test public void main() { producerTemplate.requestBody("direct:queryStandardData",null ,String.class); } }
可以看到,这里我们成功将用户表 按照条件查询的数据,插入到结果表 里面
1
2
<split></split> 这里说一下 split 在这里的作用,由于上一个路由查询出来的是一个list,所以要用这个标签拆分一下,然后将其insert到其他表中 同样在 insert values (:#user_id,:#user_name) 的时候这里需要填写正确的列名,当然你可以用 select t.user_id as userId... 驼峰命名法
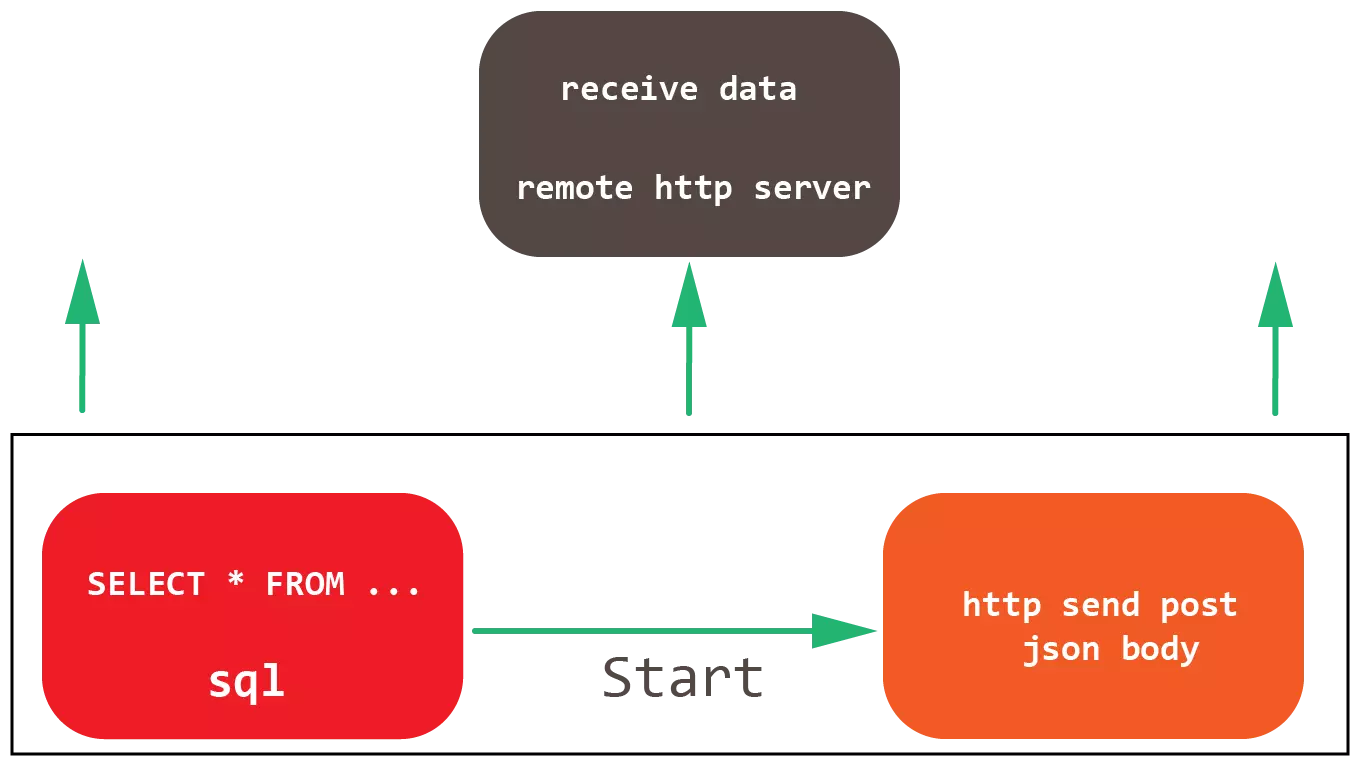
数据保存到http接口中(Demo02) 我们还可以将用户表中的数据查询出来后,调用http接口来上传这些数据,如下图:
首先来编写一个Controller
1
2
3
4
5
6
7
8
9
10
11
12
13
14
15
16
17
18
19
20
21
22
23
24
25
26
27
28
29
30
31
32
33
34
package net.wchar.camel.sample.controller;import lombok.Data;import lombok.ToString;import org.springframework.web.bind.annotation.PostMapping;import org.springframework.web.bind.annotation.RequestBody;import org.springframework.web.bind.annotation.RequestHeader;import org.springframework.web.bind.annotation.RestController;import java.util.List;@RestController public class Demo02Controller { @Data @ToString public static class Demo02Domain { private String userName; private String userAddress; } @PostMapping("/demo02") public String demo02 ( @RequestHeader("api-key") String apiKey, @RequestBody List<Demo02Domain>domain ) { System.out.println("Demo02Controller: " + apiKey); System.out.println("Demo02Controller: " + domain); return "okay!" ; } }
编写 xml dsl
1 2 3 4 5 6 7 8 9 10 11 12 13 14 15 16 17 18 19 20 21 22 23 24 25 26 27 28 29 30 31 32 33 34 35 36 37 38 39 40 <routes xmlns ="http://camel.apache.org/schema/spring" > <route id ="A001" > <from uri ="direct:queryStandardData" /> <to uri ="sql:select t.user_id as userId,t.user_name userName,t.user_address as userAddress FROM sys_user t where t.is_del= 1 and t.user_address LIKE CONCAT('%','北','%')" /> <to uri ="direct:uploadDataForHttp" /> </route > <route id ="A002" > <from uri ="direct:uploadDataForHttp" /> <marshal id ="_unmarshal1" > <json library ="Jackson" /> </marshal > <log id ="_log1" message ="${body}" /> <setHeader name ="CamelHttpMethod" > <constant > POST</constant > </setHeader > <setHeader name ="Content-Type" > <constant > application/json; charset=utf-8</constant > </setHeader > <setHeader name ="api-key" > <constant > 147258369QAZwsxedcrfv!@</constant > </setHeader > <to uri ="http://127.0.0.1:8081/demo02" /> </route > </routes >
我们先将SpinrgBoot main方法启动,然后运行 Demo02Test ,程序源代码在文章末尾
到此我们已经成功将数据上传到http服务器中
下载服务器数据到表中(Demo03) 这里将调用http接口,将返回值写入到数据库表中
编写一个Controller
1
2
3
4
5
6
7
8
9
10
11
12
13
14
15
16
17
18
19
20
21
22
23
24
25
26
27
28
29
30
31
32
33
34
35
36
37
38
39
40
41
42
43
44
45
46
47
48
49
50
51
52
53
54
55
56
57
58
59
package net.wchar.camel.sample.controller;import org.springframework.web.bind.annotation.GetMapping;import org.springframework.web.bind.annotation.RequestHeader;import org.springframework.web.bind.annotation.ResponseBody;import org.springframework.web.bind.annotation.RestController;import java.util.ArrayList;import java.util.HashMap;import java.util.List;import java.util.Map;@RestController public class Demo03Controller { @GetMapping("/demo03") @ResponseBody public Map<String, Object> demo03 ( String paramName, Integer paramAge, @RequestHeader("headerKey") String headerKey ) { System.out.println("paramName: " + paramName); System.out.println("paramAge: " + paramAge); System.out.println("headerKey: " + headerKey); Map<String, Object> resultMap = new HashMap <>(); resultMap.put("code" , "1" ); resultMap.put("message" , "请求完成!" ); List<Map<String, Object>> data = new ArrayList <Map<String, Object>>() {{ add( new HashMap <String, Object>() {{ put("resultName" , "No.1 这是服务器返回的哦: " + paramName); put("resultAge" , "No.1 这是服务器返回的哦: " + paramAge); put("resultHeaderKey" , "No.1 这是服务器返回的哦: " + headerKey); }} ); add( new HashMap <String, Object>() {{ put("resultName" , "No.2 这是服务器返回的哦: " + paramName); put("resultAge" , "No.2 这是服务器返回的哦: " + paramAge); put("resultHeaderKey" , "No.2 这是服务器返回的哦: " + headerKey); }} ); add( new HashMap <String, Object>() {{ put("resultName" , "No.1 这是服务器返回的哦: " + paramName); put("resultAge" , "No.1 这是服务器返回的哦: " + paramAge); put("resultHeaderKey" , "No.1 这是服务器返回的哦: " + headerKey); }} ); }}; resultMap.put("data" , data); return resultMap; } }
这看起来如下:
1
2
3
4
5
6
7
8
9
10
11
12
13
14
15
16
17
18
19
20
21
{ "code" : "1" , "data" : [ { "resultHeaderKey" : "No.1 这是服务器返回的哦: asdfadsfadsfasdf" , "resultAge" : "No.1 这是服务器返回的哦: 15" , "resultName" : "No.1 这是服务器返回的哦: 张三" } , { "resultHeaderKey" : "No.2 这是服务器返回的哦: asdfadsfadsfasdf" , "resultAge" : "No.2 这是服务器返回的哦: 15" , "resultName" : "No.2 这是服务器返回的哦: 张三" } , { "resultHeaderKey" : "No.1 这是服务器返回的哦: asdfadsfadsfasdf" , "resultAge" : "No.1 这是服务器返回的哦: 15" , "resultName" : "No.1 这是服务器返回的哦: 张三" } ] , "message" : "请求完成!" }
编写 xml dsl
1 2 3 4 5 6 7 8 9 10 11 12 13 14 15 16 17 18 19 20 21 22 23 24 25 26 27 28 29 30 31 32 33 34 35 36 37 38 39 40 <routes xmlns ="http://camel.apache.org/schema/spring" > <route xmlns ="http://camel.apache.org/schema/spring" id ="route1" > <from uri ="direct:startHttp" /> <setHeader name ="CamelHttpMethod" > <constant > GET</constant > </setHeader > <setHeader name ="headerKey" > <constant > 147258369QONGAS!@.54h</constant > </setHeader > <to uri ="http://127.0.0.1:8081/demo03?paramName=张三啊& paramAge=19" /> <to uri ="direct:handlerHttpResponse" /> </route > <route xmlns ="http://camel.apache.org/schema/spring" id ="route2" > <from uri ="direct:handlerHttpResponse" /> <unmarshal id ="_unmarshal1" > <json library ="Jackson" /> </unmarshal > <to uri ="log:result" /> <split > <simple > ${body[data]}</simple > <to uri ="sql:insert into sys_result(result1,result2,result3) values (:#resultHeaderKey,:#resultAge,:#resultName)" /> </split > </route > </routes >
我们先将SpinrgBoot main方法启动,然后运行 Demo03Test ,程序源代码在文章末尾
到此我们已经成功将数据从服务器上下载,并将其保存到表中
复杂案例(Demo04) 这里我们做一个复杂案例,共有三个节点
编写Controller
1
2
3
4
5
6
7
8
9
10
11
12
13
14
15
16
17
18
19
20
21
22
23
24
25
26
27
28
package net.wchar.camel.sample.controller;import lombok.Builder;import lombok.Data;import org.springframework.util.Assert;import org.springframework.web.bind.annotation.GetMapping;import org.springframework.web.bind.annotation.RestController;@RestController public class Demo04Controller { @Data @Builder public static class Demo04Domain { private String result1; private String result2; private String result3; } @GetMapping("/demo04") public Demo04Domain demo04 (Long id) { Assert.notNull(id, "id不能为空!" ); return Demo04Domain.builder().result1(id + "哈哈" ).result2(id + "你好啊" ).result3(id + "are you ok?" ).build(); } }
编写 xml dsl
1 2 3 4 5 6 7 8 9 10 11 12 13 14 15 16 17 18 19 20 21 22 23 24 25 26 27 28 29 30 31 32 33 34 35 36 37 38 39 40 41 42 43 44 45 46 <routes xmlns ="http://camel.apache.org/schema/spring" > <route id ="A001" > <from uri ="direct:queryStandardData" /> <to uri ="sql:select max(user_id) as maxUserId from sys_user" /> <to uri ="direct:startHttp" /> </route > <route xmlns ="http://camel.apache.org/schema/spring" id ="A002" > <from uri ="direct:startHttp" /> <log id ="_log1" message ="${body}" /> <setHeader name ="CamelHttpMethod" > <constant > GET</constant > </setHeader > <setHeader name ="headerKey" > <constant > 147258369QONGAS!@.54h</constant > </setHeader > <toD uri ="http://127.0.0.1:8081/demo04?id=${body[0][maxUserId]}" /> <to uri ="direct:handlerHttpResponse" /> </route > <route xmlns ="http://camel.apache.org/schema/spring" id ="A003" > <from uri ="direct:handlerHttpResponse" /> <unmarshal id ="_unmarshal1" > <json library ="Jackson" /> </unmarshal > <to uri ="log:result" /> <to uri ="sql:insert into sys_result(result1,result2,result3) values (:#result1,:#result2,:#result3)" /> </route > </routes >
我们先将SpinrgBoot main方法启动,然后运行 Demo04Test ,程序源代码在文章末尾
到此我们已经成功完成这个复杂操作了 ̄▽ ̄ )ブ
请注意to标签动态参数:
1
2
3
4
这样是取不到值的 <to uri="http://127.0.0.1:8081/demo04?id=${body[0][maxUserId]}"/> 下面这个是正确的哦 o(* ̄▽ ̄*)ブ <toD uri="http://127.0.0.1:8081/demo04?id=${body[0][maxUserId]}"/>
完
本博文源码: https://github.com/wchar-net/camel-xml-dsl-example


